Kitchens, built in the right order.Kitchen remodeling in Charleston and Columbia, SC
Layout first, then framing, wiring, cabinets set level and tile that lines up. Try the finishes on our design study, then get a free written quote for the labor.
- Iago measures the room himself
- Electrical under our South Carolina license
- Free written quote for the labor
1 / 5
Today
The room as it is.
Concept film made to show the order of the work. It is an illustration, not a photo of a Nexus job.
What a kitchen remodel includes
Today
Design study. Illustration of the stages, not a photo of our work.
Stage 1: Demolition
The old room comes out, the rest of the house stays clean, and the plan gets confirmed.
Cabinets, counters and backsplash out
Old cabinets, countertops, backsplash tile and flooring removed. Appliances disconnected and moved out of the way.
Why: Careful demolition leaves the walls and subfloor you are keeping ready to build on.
Walls and soffits
Walls the plan removes come out, with temporary support in place first if they carry load. Soffits above the old cabinets are removed or reframed.
Why: Opening a kitchen is a structural job before it is a design one. The load has to go somewhere.
Subfloor check
With the floor bare, the subfloor at the sink, dishwasher and refrigerator is checked. Damaged sections are cut out and replaced.
Why: Floors fail from below. A soft spot left in place comes back as a cracked tile or a plank that moves.
Stage 2: Rough-in
Framing, wiring, plumbing and gas go inside the walls and are checked before anything is closed.
Framing and blocking
Soffits, bench seats and island walls framed. Blocking set for upper cabinets, open shelves and the range hood.
Why: Upper cabinets full of dishes are heavy. They hang from framing, not from drywall.
Electrical rough-in
Circuits for the appliances that need their own, recessed lights, under-cabinet lighting, island power and switch locations, all run while the walls are open.
Why: A kitchen draws more power than any other room. Circuits sized for the appliances keep breakers from tripping when two of them run together.
Plumbing and gas
Sink supply and drain moved to the new layout. Lines run for the dishwasher and refrigerator. Gas rerouted for the range and tested under pressure.
Why: An island sink or a range on a new wall only works if the lines are in the right place before the floor and walls close.
Hood duct
The duct for the range hood is run to the size the hood's spec sheet calls for.
Why: A hood only clears the air if the duct behind it is sized and routed for it.
Stage 3: Drywall, cabinets and tile
Drywall, cabinets, tile, paint and trim-out, in the order that protects each one.
Drywall and patch
New drywall hung. Old walls patched, skimmed and sanded where cabinets and backsplash came off.
Why: Paint and tile show every ridge. Flat walls are what make the finish look clean.
Cabinets set level
Base cabinets set to a laser line from the high point of the floor, shimmed, joined and fastened to studs. Uppers hung to the same line. The island anchored to the floor.
Why: Countertops are made to fit the cabinets. Level, in-line boxes mean a tight joint at the wall and doors that hang even.
Countertop coordination
Stone tops are measured and set by the fabricator you buy them from. We have the cabinets ready for that measure and come back for the sink, faucet and backsplash once the tops are in.
Why: The fabricator measures what is there. If the cabinets are right, the tops fit the first time.
Backsplash tile
Layout starts from the center line of the range or the sink, with cuts balanced at both ends and outlets worked into the pattern.
Why: The backsplash sits at eye level. A centered layout is the difference between tile that looks planned and tile that looks like it ran out.
Flooring
Tile or plank installed over a flat, sound subfloor, with clean transitions to the next room.
Why: Flat subfloor first. It is what keeps tile from cracking and plank joints from opening.
Stage 4: Trim-out, paint and trim
Drywall, cabinets, tile, paint and trim-out, in the order that protects each one.
Electrical trim-out
Lights, switches, dimmers, under-cabinet lighting and outlets installed and tested one by one.
Why: Every device is tested before the job moves on, GFCI protection included.
Plumbing and appliances
Sink, faucet, disposal and dishwasher connected. Range, hood, refrigerator and built-in units set in their openings, connected and run.
Why: Every connection is run with water and checked dry before the cabinet doors close on it.
Paint and trim
Walls, ceiling and trim painted. Crown, toe kick, base and casing installed and caulked.
Why: Trim is where the eye stops. Tight joints and straight paint lines are what you notice every day.
This is the typical sequence. The exact order and the length of each stage depend on the scope, material lead times and inspection dates.
Take a kitchen from demo to done
Kitchen, 14 ft x 11 ft, 9 ft ceiling
The room as it is: dated finishes, tired layout.
Today. The room as it is: dated finishes, tired layout.
Measurements we check on every kitchen
36": Counter height, from the floor you will stand on
Base cabinets are 34 1/2" tall and a stone top adds about 1 1/2". That lands the counter at 36", but only if the boxes are set to a level line taken from the high point of the floor. Set them off the low point and the dishwasher will not fit under the top.
Standard base cabinet height plus countertop thickness
18": Space between the counter and the uppers
Upper cabinets hang with their bottoms 18" above the counter, so a mixer or a coffee maker fits under them. The hanging line is marked from the finished counter height, and the uppers go into blocking set while the walls were open.
Common clearance for wall cabinets over a counter
42": Room to work between the counter and the island
We check the aisle before an island is anchored: 42" is the common guideline for one cook, more if two people work in the kitchen. Open dishwasher and oven doors use up most of it, so we check them too.
Kitchen planning guideline for a work aisle
24": Outlets along the counter
Counter outlets are spaced so no spot along the counter is more than 24" from one, on the 20-amp circuits a kitchen needs, with GFCI protection. Box heights are set to the backsplash you picked, so the cover plates land on the tile pattern instead of a thin cut.
National Electrical Code rule for countertop receptacles
Codes are adopted and amended town by town, and the building department has the final say. Where the local rule asks for more, we build to it.
Kitchens from our job sites
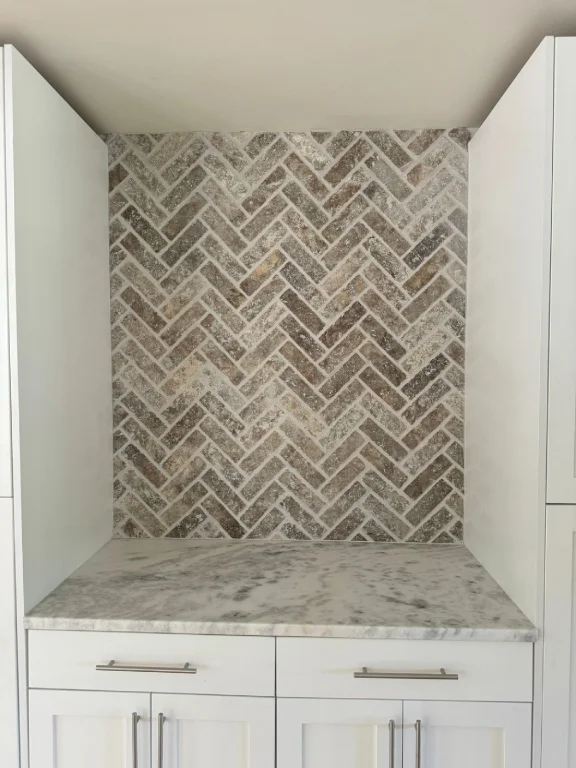
Herringbone backsplash in a cabinet nook. 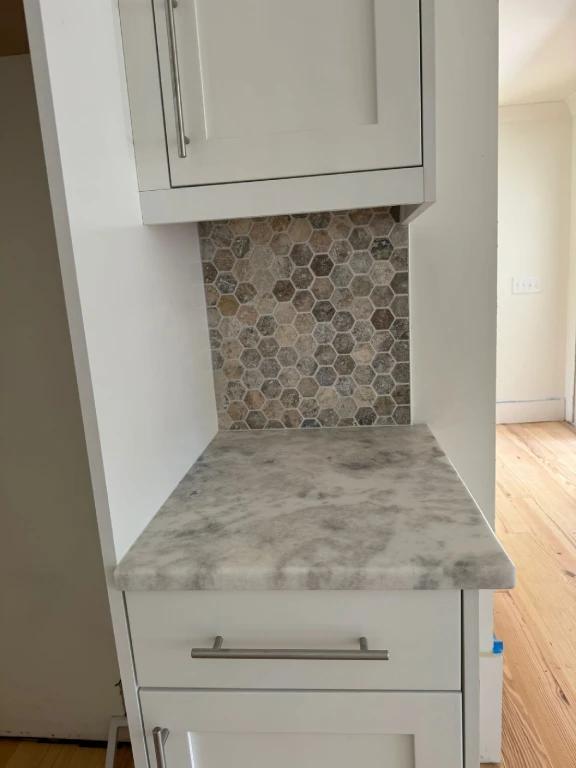
Hex mosaic backsplash between upper and lower cabinets.
You buy the cabinets, we install them
Nexus quotes and bills labor only. You choose your cabinets, countertop, tile, appliances and fixtures and pay the supplier directly, with no markup from us. We tell you what to order, how much, and when it needs to be on site.
Nexus brings
- The crew and the tools of the trade
- Carpentry, framing, drywall, tile, trim and paint labor
- Electrical work, under a South Carolina electrical license
- The order of work and the list of what to have on site
On your list for a kitchen
- Cabinets and hardware
- Countertops, measured and set by the fabricator
- Sink, faucet and disposal
- Appliances and range hood
- Backsplash tile, flooring, grout and setting materials
- Light fixtures, switches and devices
- Lumber, drywall, wire, pipe, paint and the other rough materials on the list we give you
Labor only. All materials, equipment rentals and deliveries furnished by others (GC/Owner).
Kitchen questions
Tell us about the kitchen.
Send a few details, or the design you built above. We will set up a time to come out and measure. The visit and the written quote are free.
Call or text
Kitchen remodeling near you
Based in Ladson. Working around Charleston and Columbia, South Carolina.